16 best tips in Windows 7 -
16 best tips in Windows 7 -
Assalamu Alaikum
I have come with Noor Alam, an important topic in front of you today,
I hope you all are very good. I am also Alhamdulillah, hope that our today's topic will be of great help to you.
I am very happy if you get a little benefit from reading this textbook.
The topic that we will discuss today is the 16 best tips in Windows 7 -
 |
16 best tips in Windows 7 -
|
In this modern era, most of us use our Windows 7 Seven. But we do not know much about Windows Seven. We can learn about Windows Seven for some reason that this post is our today. Hopefully you will be benefitted greatly. There are many types of things hidden inside Windows 7 that we do not know yet. Today we have come up with such unknown-unknown Windows Seven Topics. From here you can find out about these 16 unknown information and you can use them. There is no end to know, we have to be constantly in the jana, we can share as much as we can with you. If you like it we will love it too. If you do not talk further, let's go to our main discussion-
We'll divide the story of today's discussion into a few parts so that you can easily understand.
We'll divide the story of today's discussion into a few parts so that you can easily understand.
Firstly, we do not know the main points of our discussion-
1) Use hidden wallpapers and themes -
2) Display a quick lunchbar in the taskbar -
3) Display Power Efficiency Report -
4) Search the Internet from Start Menu -
5) Shut Down Button Customize -
6) Adding video link to Start menu -
7) Check box for multiple file selections -
8) Open any folder on the dose command prompt -
9) Close the search feature of Windows Explorer -
10) Use of Windows Key and Tab Key Function -
11) Bypass Recycle Bin -
12) Launching Windows Explorer Quickly -
13) Turn on Windows secret shortcut key -
14) Bypassing Windows Splash Screen -
15) Locking Windows Fast -
16) Show hidden files, folders and drives -
From the above discussion, we realized that maybe there is very little. The details are discussed below, so that we can understand it correctly and completely -
1 Use hidden wallpaper and theme -
The language and currency that you select will be installed in the specific background and theme of the language. Backgrounds and themes from different English-language countries such as Australia, Canada, Great Britain and South Africa are different. But if you want to use them, you have to install Windows in a different language. But by customizing it is very easy to do the job.
1. Click the Start menu and type C: \ Windows \ Globalization \ MCT in the search box and press Enter. (Note: If you have not installed the C drive and installed it on a different drive, type the name of that drive.)

- 2. MCT-AU, MCT-CA, MCT-GB, MCT-US and MCT-ZA window explorer will appear with sub-folders like the image below.
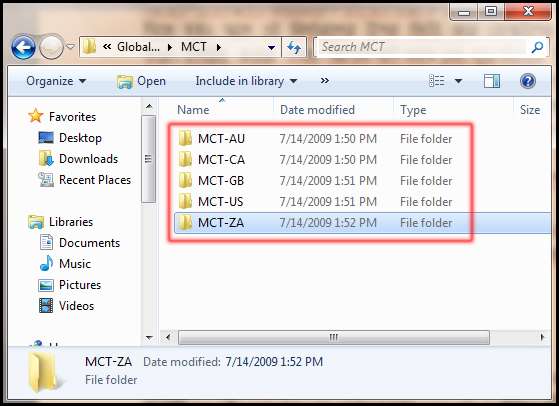
Note: South Africa is indicated by MCT-AU by Australia, Canada by MCT-CA, MCT-GB Great Britain, MCT-US by the United States and MCT-ZA.
3. Select the country background and theme you like. For example, the theme of South Africa has been shown using.
4. Double-click the MCT-ZA to the right of the window explorer.
5. Double click on the theme from the folder that appears.
6. Notice that one or more theme files are being displayed.
7. Double click on the required file.
Notice that the control panel is displayed in the Personalization section as the selected theme and the wallpaper's shortcut.
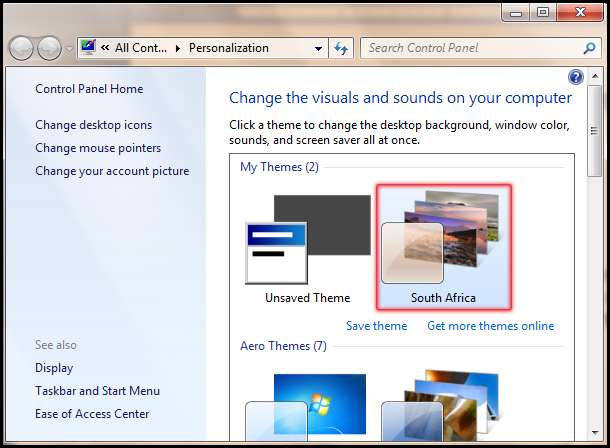
- This can be used very easily. Check out the themes with nice images once. InshaAllah would love it.
Displaying a Quick Lunch at 2 Taskbar -
Windows 7's new taskbar function, which acts as a program launcher and task switcher. As a result, the old Quick launch bar has been dropped. But if you miss the applet, you can add it back again. To work, follow the procedure below:
1. Click the right mouse button on the taskbar.
2. Click New Toolbar.
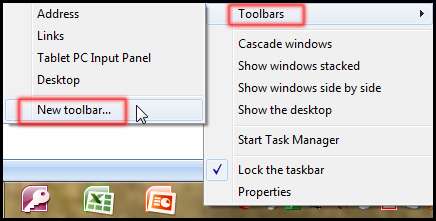
- 3. Copy and paste the next bracket (% userprofile% \ AppData \ Roaming \ Microsoft \ Internet Explorer \ Quick Launch) into the Folder's home page of the Choose a Folder dialog box.
- 4. Click the Select Folder button again.
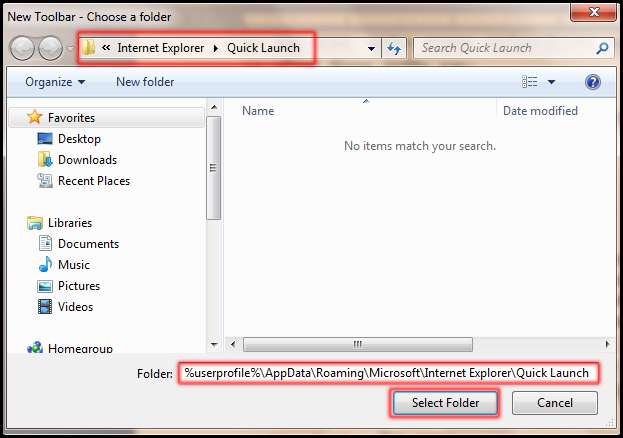
Notice that the Quick Launch Bar has been added to the Tuxbar.
5. To make it even more effective, click the right mouse button on the taskbar and select Lock the taskbar. This time, you can display Quick Launcher as you like. If you wish, you can add a program icon by dragging it. You can also delete icons if needed.
3 Power Efficiency Report Display -
Do you want to increase your laptop's battery life? There is a hidden feature in Windows 7 that will check your laptop and recommend various ways to keep the laptop up to date. So let us know how to use it?
1. Click Start button.
2. The cursor will be automatically in the search room. Now type cmd by keyboard; As a result, the cmd program appears and click on the right mouse button and click "Run as administrator".
3. Now at the command prompt, powercfg -energy -output \ laptoplife \ Energy_Report.html, type (be careful not to spell it) and press Enter on the keyboard.
Note: Copying the command to the wrong can be done by copying it with the mouse.
By applying a few minutes of a few minutes, the battery will be displayed in the HTML format (Energy_Report.html) by creating information related to the laptop's battery.
Note: In this case, we created a folder named LaptopLife in C Drive.
To view the report just open the folder called Laptop in C Drive and Double-click to view the Energy_Report.html file.
4 Search the Internet from Start Menu -
We all know that the search box can be handled by various computer files. But the Internet can be easily browsed from here. Take the following steps to start this amazing feature.
1. Type GPEDIT.MSC in the Start Menu Search box and press Enter.
2. The Group Policy Editor will appear on the screen.
3. Double-click the User Configuration folder.
4. From the displayed folder, just click on the Start Menu and Taskbar folder.
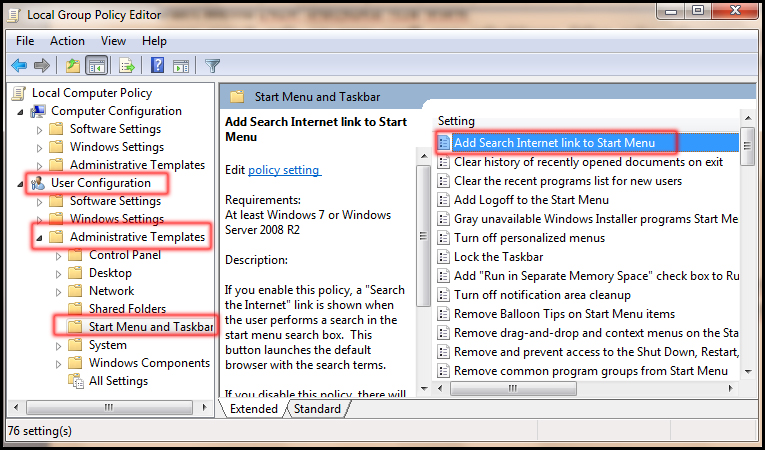
- 5. Notice, there are several options displayed in the post office. Double click on Add Search Internet link to Start Menu located above the top.
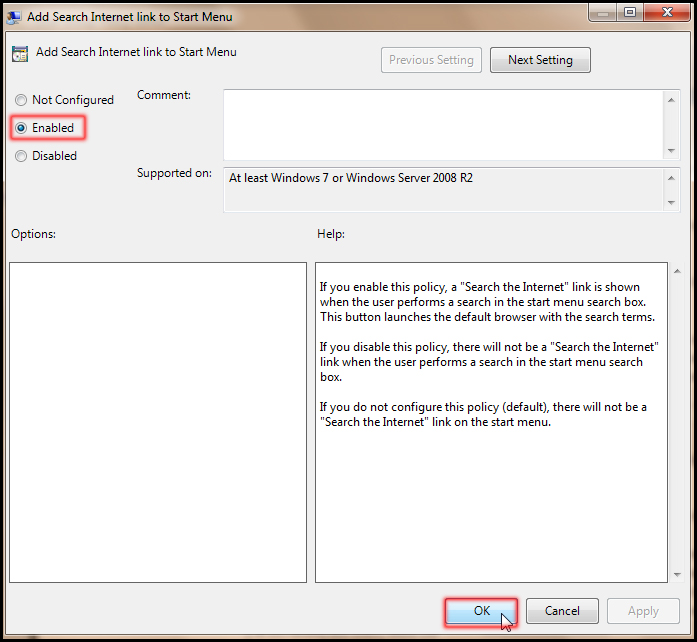
- 6. Select the Enable button in the dialog box that appears and click OK.
- 7. Type something in the search box this time. Notice that the search is displayed on the internet; Click on the search the internet to find typed text. View automatically opens the default browser and your desired information is displayed.
- 5 Shut Down Button Customize -
- Shut down button is activated by default to shut down the Start menu. But if you wish, you can use this button for any other reason. Such as Switch User, Log off, Lock, Restart, Sleep
- Suppose we want to use the Restart action by changing this default setting. Take the following steps for this.
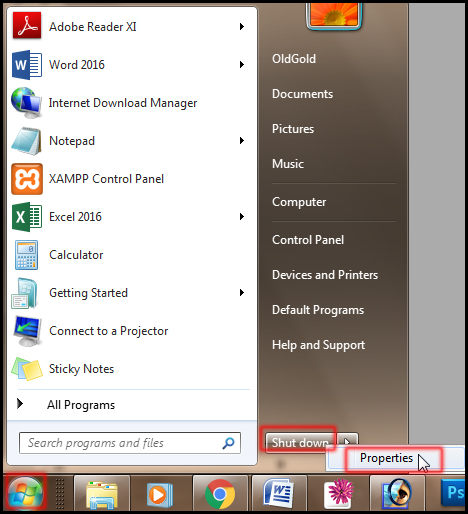
- 1. Click the Start button and right-click on the Shut down button and then click Properties.
- 2. Now click on the Power button action drop-down and select Restart.
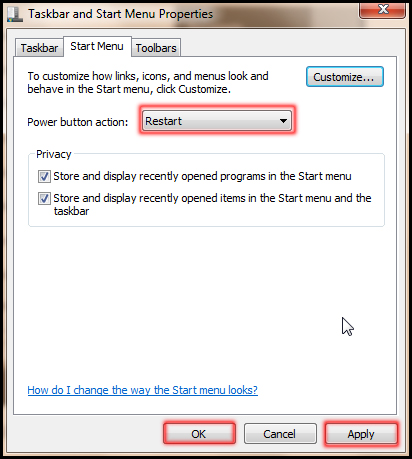
- 3. Finally, click the Apply button and click on the Ok button.
- By clicking on the Restart button, notice that the Restart Button is defaults by this time. Now if you click on the power action button, the computer will not restart and restart again.
- Note: If you want to shut down the computer by clicking on the power action button and then click Shut down again.
- 6 Adding Video Links to Start Menu -
- Windows 7 Pictures and Photo Folders are linked to the Start Menu; But there is no link with the video folder. If you want to link the video folder to Start Menu, please take the following steps.
- Suppose you want to link a specific folder to the Start Menu link.
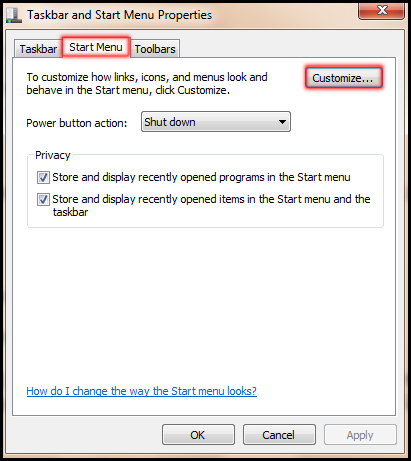
- 1. Right-click the Start menu and click Properties.
- 2. Click the Customize button on the Start Menu tab of the dialog that appears.
- 3. Now in the Customize start menu dialog box, select the radio option of the video option below. Click OK and click Ok.
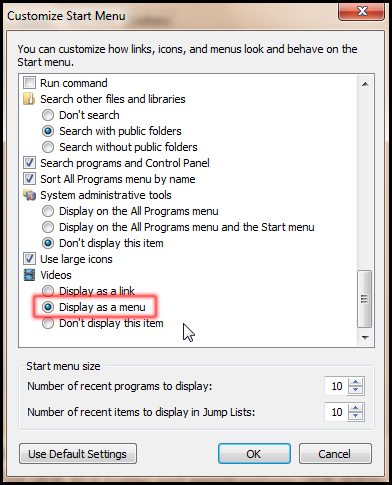
- 4. Click the Apply Now button and click OK.
- 7 Checkboxes for multiple file selections -
- Copying, moving, and deleting multiple files is required to select the file. We select different methods. But by clicking on the mouse in windows 7, more than one file can be selected. For this, follow the following procedure.
- 1. Press the Windows key + E on the keyboard. Or open Windows Explorer in a different way.
- 2. Click the Organizer drop-down of the Windows Explorer and then click Folder and search options.
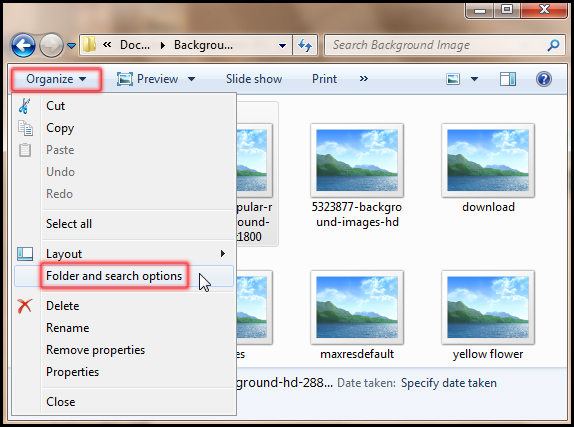
- 3. Select View tab.
- 4. Scroll down to the bottom of the advanced setting and select "Use check boxes to select items" and click OK and click OK.
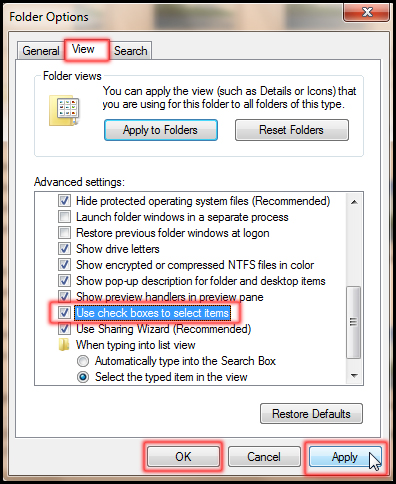
A window will appear in a check box on the Windows Explorer file or folder. You can select those folders or files by clicking on the check box.
Note: To cancel the procedure, scroll down to the bottom of the Advanced setting and select "Use check boxes to select items" and click Apply and then click OK.
8 Open any Folder DOS command at the prompt -
This is an amazing tips. Many folders are needed to open at the dos command prompt. Opening a folder in DOS mode is annoying. But using the mouse only can be easily accomplished.
1. Hold down the Shift key on the keyboard and right-click the mouse on the folder that you want to open at the dot command prompt.
2. Select "Open Command Window Here" from the displayed menu.
Notice that the folder is open at the dot prompt.
Note: It is notable that these tips will not work in the Documents folder.
9 Close windows search feature of Windows Explorer -
When you search for your PC through Windows Explorer, the recent searches you have saved are saved and then viewed. But if you do not want others to notify you about your search topic, you can turn off the search feature. Take the following steps for this.
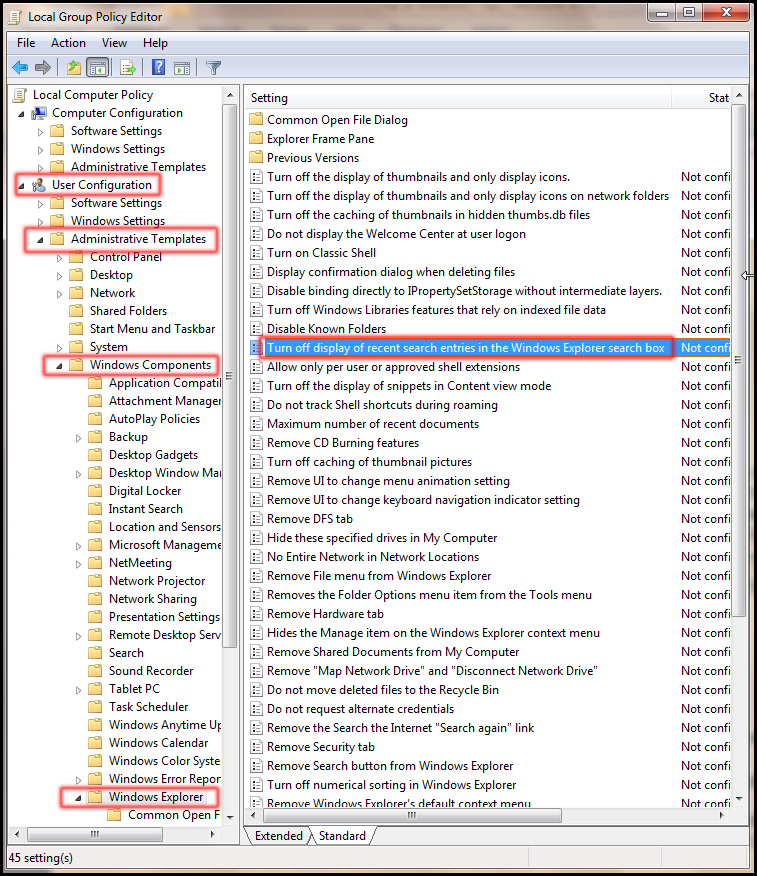
1. Type GPEDIT.MSC in the Start Menu and press Enter.
2. Double-click Administrative Templates in the User Configuration's Administrative Configuration dialog box.
3. Double-click Windows Components to display the results that are displayed there.
4. Double-click on the Windows Explorer to display the results that appear next.
5. Double click on "Turn off display of recent search entries in the Windows Explorer search box" located in the right cell.
- 6. Select the Enable radio button in the dialog box that appears and click on the Apply button and click on the Ok button।
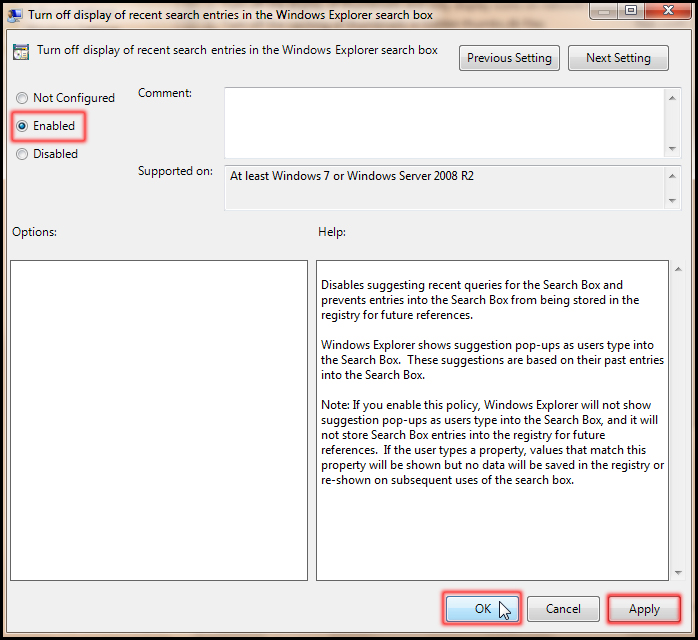
Note: Your feature search feature is turned off by that time. To start, select Not Configure again.
Using the Windows 10 Key and Tab Key Function -
When you open multiple windows, when you want to see all the windows together, press the keyboard key on the keyboard and press the Tab key. To move from one window to the window, press the Tab key again by pressing the Windows key. Press the necessary Windows and Tab keys to activate the necessary windows and leave it on display.
11 Bypass Recycle Bin -
Windows's Recycle Bin acts as a protective option. Because when we delete a file it is deposited in this recycle bin. Later that can be permanently deleted. But after deleting any deleted files, do not submit it to the Recycle Bin and permanently delete Shift + Del on the keyboard and press Shift + Enter to confirm later.
If you wish, you can permanently close the recycle bin. That means, if a file is deleted, it will be deleted directly without recycling. Take the following steps for this.
12 Windows Explorer Quick Start -
Although Windows Explorer can be opened by the mouse. But press the Windows Logo + E on your keyboard to run faster. See Windows Explorer is running very fast.
13 to turn on Windows secret shortcut key -
Many menu shortcuts are hidden under Windows default. Take the following steps to use them.
Open Control Panel from the Start menu.
Double click the Ease of Access Center.
Now you have the options you need.
Click OK and click the Apply button.
14 Bypass Windows Splash Screen -
This option is used to close the Windows splash screen and boot the computer faster. Take the following steps for this.
Windows Run Windows Command + R Run the command.
Type msconfig and press Enter on the keyboard.
- Now on the "No GUI boot" check box on the Boot tab.
- Click the Apply button and click the Ok button.
- 15 Fast Locking Windows -
- This option is used to protect computers from unwanted users by locking Windows. Take the following steps to lock Windows faster.
- Press Windows Logo + L on the keyboard.
- 16 Show hidden files, folders and drives -
- Take the following steps to see Windows's hidden files, folders, and drives.
- Windows Run Windows Command + R Run the command.
- Type the folder and press Enter on the keyboard.
- Select View tab.
- From the hidden files and folders, select the "Show hidden files, folders, and drives" radio button.
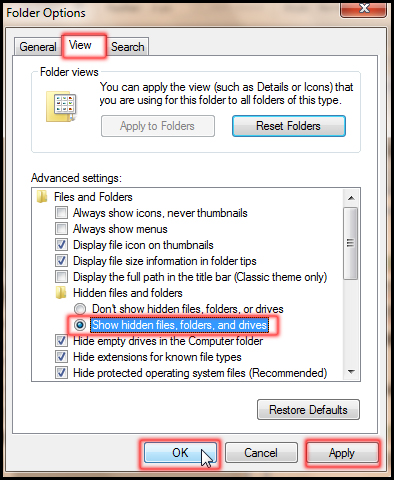
- Then click on Apply button and click OK.
- Hopefully you understand clearly from the above discussion. If someone has any questions, then we can make a comment. We will try to answer your question correctly. And you can comment on how your post was feeling. Thank you so much for reading our post patiently. Keep an eye on our site for a better post later. We will try our best to post better. We wish you all to be well-off here today. Thanks again to all of you. Wait for the next post, Allah Hafez,


No comments